Advanced Audio Functions of CoCo-80
Download PDF | © Copyright Crystal Instruments 2016, All Rights Reserved.
Introduction
CoCo-2, CoCo-80 and CoCo-90 are all equipped with advanced audio functions. These audio functions allow you to listen to the vibration or any measurement quantity or record voice annotations during signal recording. This document describes how to use the audio functions.
The advanced audio features can be summarized as following:
You can listen to any measurement input using headphones without interrupting the measurement or recording process.
The audio monitoring is automatically scaled to the listening range and the headphone audio can be manually adjusted.
You can record voice annotations at any time and length during time stream recording.
A customized microphone is available with a push button to control voice annotation recording.
Voice annotations can be replayed on the CoCo hardware through headphones.
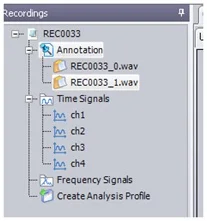
Voice annotations are attached to each recorded file, and can be played back on the PC using the EDM software
CoCo can play back any recorded time streams using its output port. The output port can drive another audio device such as headphones or external speakers.
These advanced audio functions require the following minimum hardware and software versions: CoCo Software Version ≥ 1.7.8; Base Hardware System Version ≥2.0.9; Measurement Hardware Version ≥ 10.1.0; Firmware Version ≥ 1.5.0.
Hardware Audio Peripherals
Three hardware audio peripherals are used for the advanced audio functions:
Internal Speaker
External Headphone
External Microphone
The internal speaker is used to generate system-related signals, such as the sound simulating the key press, power-on/off or alarm. Voice annotations and measurement input audio can only be played back through headphones and not through the internal speaker.

Figure 1. Built in Speaker
The external headphone jack uses the 3.5mm stereo jack connector. You can connect any headphone to this connector.

Figure 2. An example of headphone
The headphone jack is located at the second to the left with a headphone symbol. Voice annotations and measured input audio can be played back through the headphones.
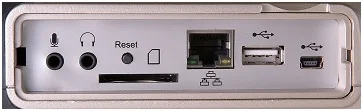
Figure 3. Connectors
The external microphone must be ordered from CI. It is designed so that when the microphone button is pushed, the voice annotation recording is activated. The microphone jack connector is on the left side of the peripheral panel. Do not use any microphone other than the specified CI microphone because without the microphone button hardware, you will not be able to start a voice annotation recording.

Figure 4. Microphone with push button (part # CoCo-A12)
Operations of the Audio Functions
Audio Setup
The audio functions are controlled through the CoCo, Setup->Audio Setup screen.
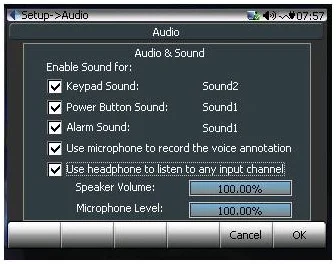
Figure 5. Audio Setting page
Keypad Sound: Enable and select the internal speaker sound output when any of the buttons are pressed.
Power Button Sound: Enable and select the internal speaker sound output when the power button is pressed.
Alarm Sound: Enable and select the internal speaker sound output for system alarms.
Use microphone to record the voice annotation: Enable the external microphone recording function. When this item is checked and the user presses the connected microphone button, the voice annotation is recorded until the button is released. Multiple annotations can be recorded during a measurement. If this item is not checked, the microphone button will not activate any voice recording.
Use headphone to listen to any input channel: Enable the external headphone listening function.
Headphone Listening
When "Use headphone to listen to any input channel" is enabled, under the F3 Control Button of the signal display screen, you will see the Headphone Playing menu item. Select one of the input channels. If you do not want to listen to the input channels, then set the selection to System Sound or Recorded Annotations.

Figure 6. Select the Channel for Headphone Listening
Record the Voice Annotation
After “Use microphone to record the voice annotation” is checked in the audio setup, connect the external microphone (Part #CoCo-A12) to the microphone jack. Press the Rec/Stop button to record the time signals. While the time signals are being recorded, you can press the microphone button to record your voice annotation. The voice annotations will be attached to the recorded time streams. The green bar on the right bottom corner on the screen indicates the volume of the signal received by the microphone.
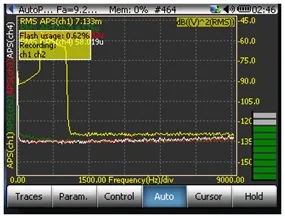
Figure 7. Monitor the volume of the microphone input
Playback the Voice Annotations on CoCo
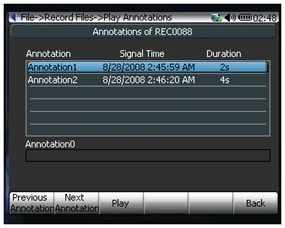
To play back the voice annotation, first press the File button, then the F1 Files, then the F2 Voice button.
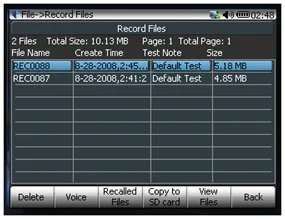
Press the F3 Play button allows you to hear the previously recorded voice annotation. Then you can use the F1 Previous Annotation or F2 Next Annotation Buttons to play all the annotations. If Voice button is not shown, it means the signal file saved has no voice annotation attached.
Playback the Voice Annotations on EDM
Voice annotations will be listed under each recorded or saved signal files and can be played back with EDM PC software. This is shown in the following picture: